FAQ
General
Schema Playground
Discovery Guide
General

The Data Discovery Engine is a website that provides guidance for researchers on how to make their data discoverable and reusable, and bring the practical benefits of data sharing to researcher’s own research projects, as well as the research community as a whole.
- Users interested in registering metadata with the goal of making their metadata Findable, Accessible, Interoperable and Reusable (FAIR).
- Users interested in developing a schema to represent the data they are interested in via an existing extensible schema standard.
- Metadata forms that output compliant structured metadata based on specific project requirements.
- A group of tools to help you create a schema and validation rules by extending existing classes.
- Project specific portals that take advantage of all the tools in the DDE to register compliant metadata based on their own unique schema and tools to manage that data.
- Metadata based on Schema.org standards that makes it indexable by major search engines.
Through it's three main components the Data Discovery Engine can support: the extension and reusability of schemas, structured metadata tools that utilize those schemas and making the resulting metadata accessible through our API and Data Portals supported.
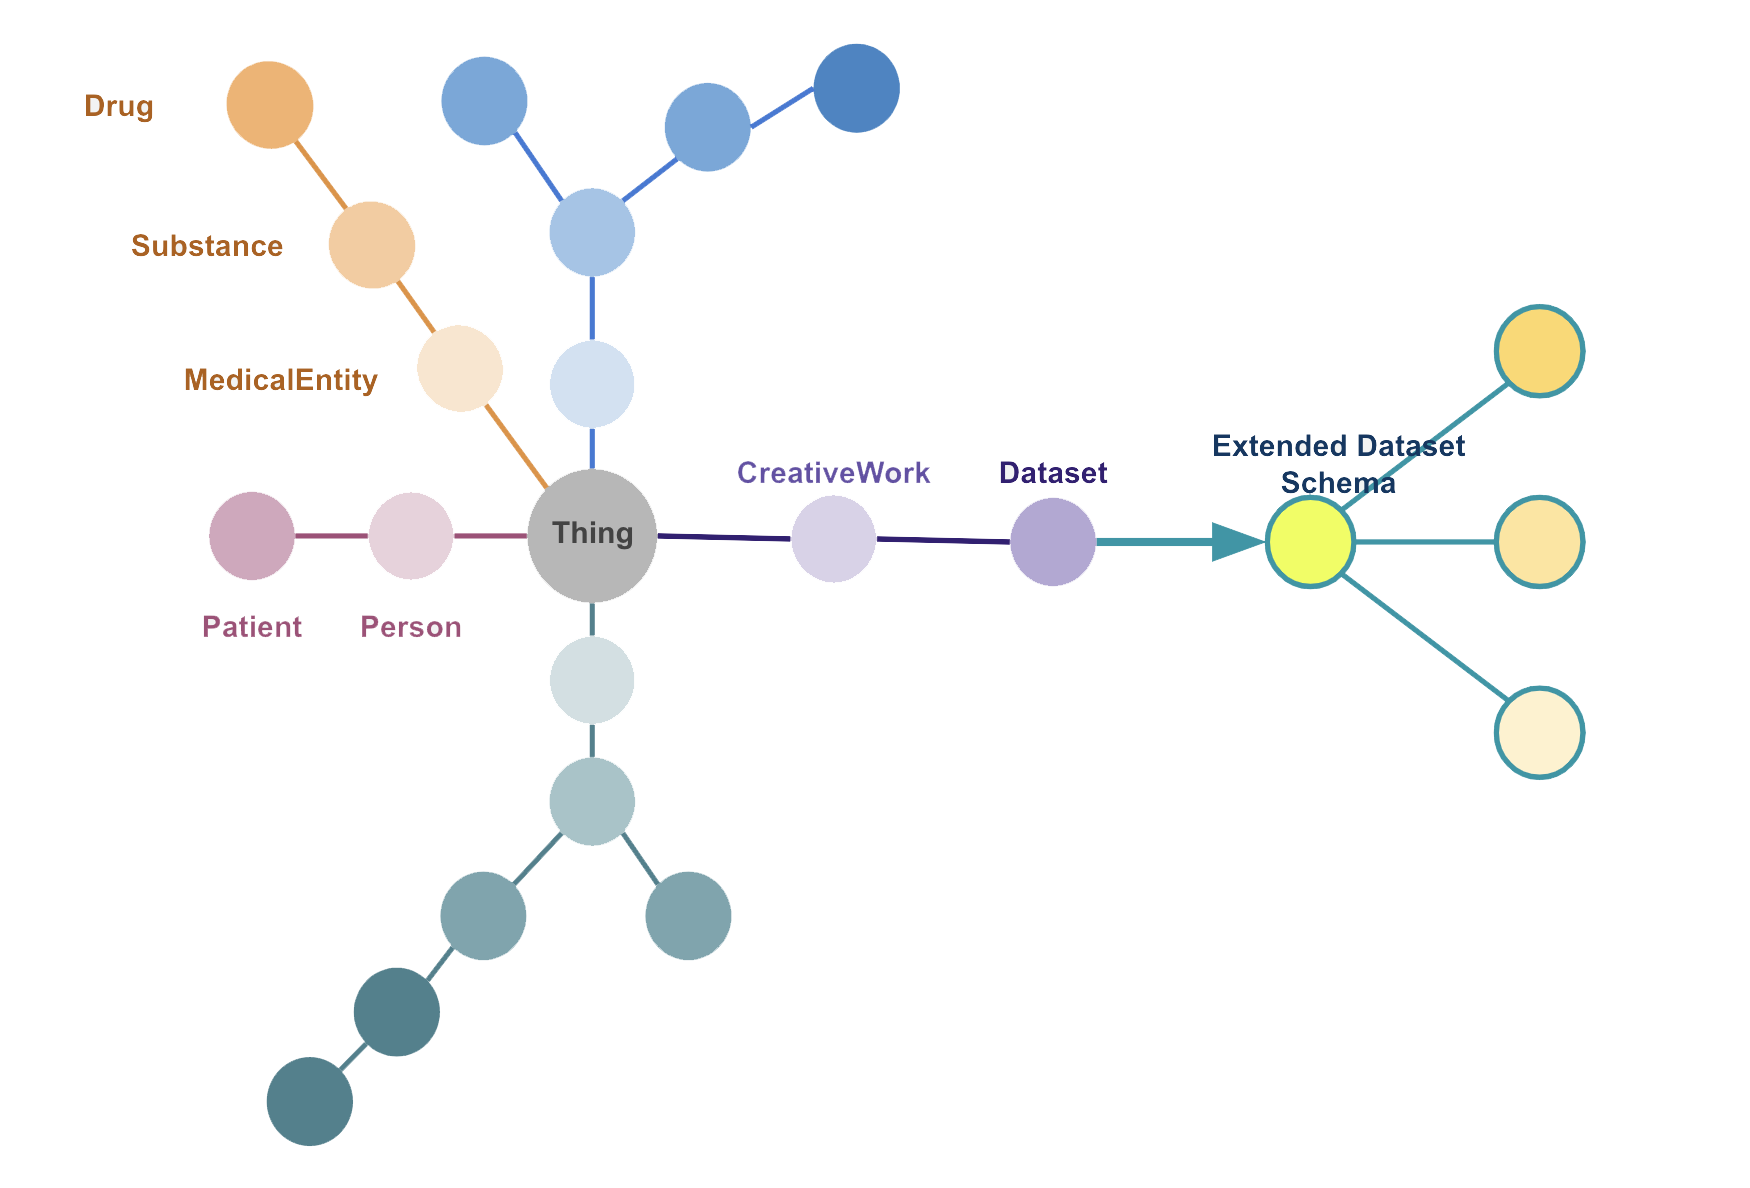
Schemas can be thought of as a set of 'types', each associated with a set of properties that further define that type. The types are arranged in a hierarchy and each type inherits the properties of all its parents.
An example of a type's hierarchy can be seen here: Thing > Person > Patient
We use Schema.org's schemas as the base vocabulary due to it's very generic nature. From that collection of schemas you can easily find a starting point, extend that schema and define more specific schemas related to your reserach.
All registered schemas are also available via our registry. Feel free to browse it for existing examples.
The Data Discovery Engine is built with a very extensible infrastructure based on reusability and thus it can easily integrate multi-purpose portals.
The core of this project is based on Schema.org and re-using and extending an existing microdata markup format to boost the discoverabilty of and findability of biomedical research.
Currently it provides support for biomedical and COVID-19 focused portals.
If your data portal currently uses structured metadata or you believe it could benefit from ingesting structured metadata. You can use the tools we provide to author/covert your own schema and create custom validation rules.
With a customized schema and validation you can generate a dynamically generated form custom to your specifications and use it to format data to your schema structure.
If you believe the Discovery Data Engine could benefit from the addition of your portal based on the area of focus please contact us.
Your user dashboard is place where you can easily manage and quickly access your registered schemas and registered metadata. To view your dashboard you must log in using a valid GitHub account then click on your user image on the menu.
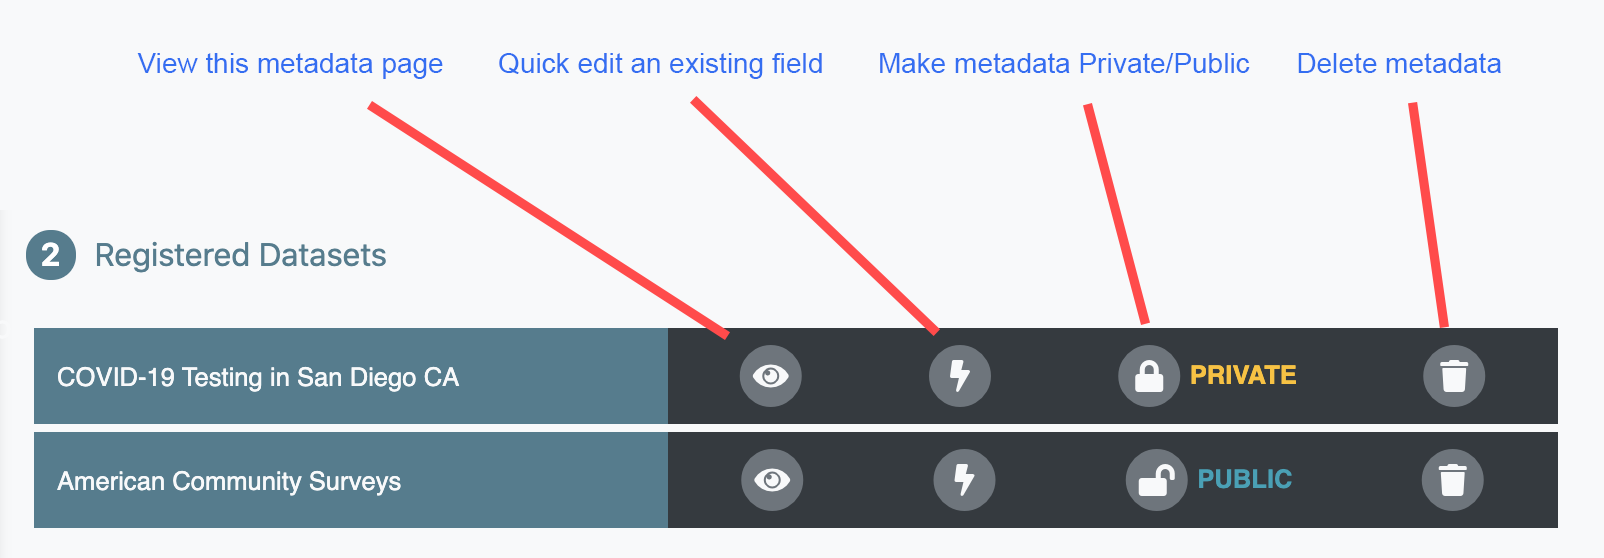
Options include: view, quick edit, make private/public, and delete.
If you believe you have a great idea for a new feature or if you found an issue while using any of our tools please create an issue via GitHub and let us know what happened and how we can reproduce the issue.
Schema Playground
The Schema Playground is a place where you can find a large number of existing bio-medical and general purpose schemas. It is also a place where you can extend an existing schema to create your own, visualize and register* it to share with the community.
- If you DON'T have a schema > Search for existing schemas to re-use or extend an existing one.
- If you DO have a schema > Visualize your schema and register it so others can re-use it and in turn helping our efforts to make data re-usable.
You will need a valid GitHub account or an approved organization account to register new schemas. Sign up for one, it's easy and free!
Our Schema Playground features common starting points (Dataset, Protocols, etc) and also a registry of classes from reputable sources to help you decide the right starting point.
You can browse existing schemas from the community and Schema.org schemas in our registry.
If you do not need to extend a schema and would like to use it as is, you can download it by clicking the source link in that schema's home page.
For example, here is the homepage of an extended Dataset schema you may want to re-use: https://discovery.biothings.io/ns/outbreak.
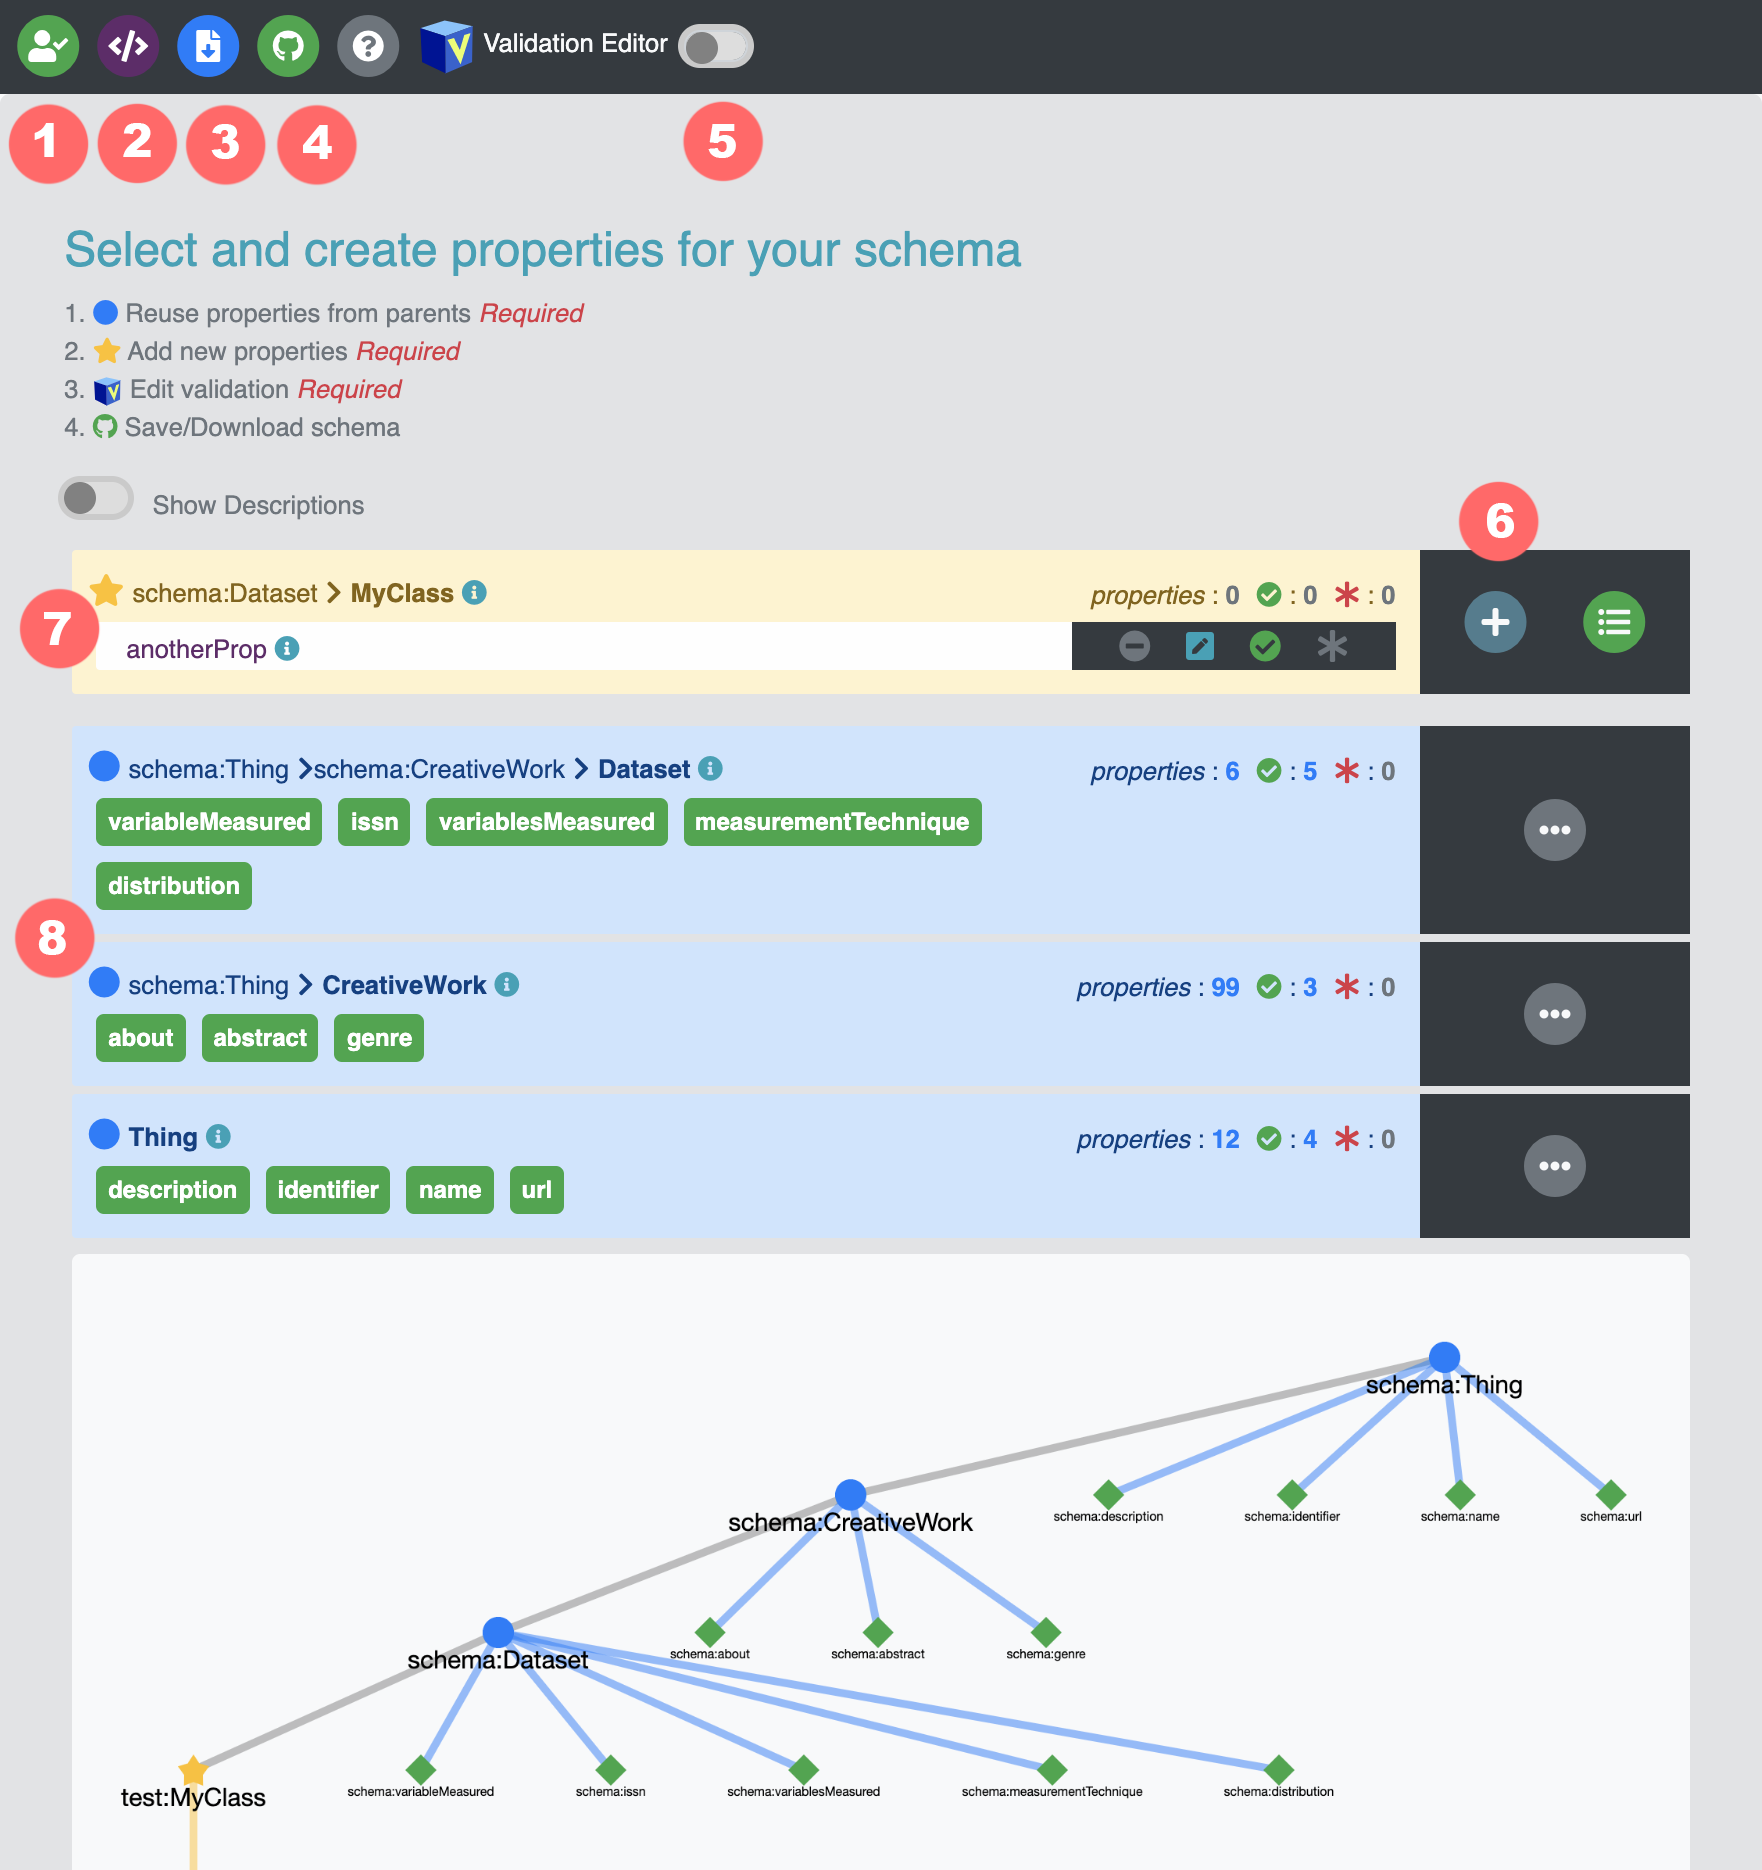
Once you find a Class you wish to extend, you will be asked to choose a unique namespace that hasn't been registered before. This will be the prefix attached to each new definition you provide. Since you are extending a Class, you will be asked to create a new Class that is more specific to your needs but follows the same hierarchy as its parent Class. Once that is done, you can begin picking the properties from its parents that you want to use to define your metadata and finally add any new properties (8) not included with a proper unique name.
Once you are happy with your schema definition you have an option to download (5) your work or if you logged in with GitHub, you may choose to use the built-in GitHub tool to save your work directly to an existing or new public repository. Your saved work can then be visualized and registered via our Schema Playground, and you can easily manage your contributions via your own user dashboard.
- Log-in status.
- Preview your work.
- Download your work.
- Save to GitHub directly* Requires GitHub login and permission.
- Add a new property to your class.
- The extended Class you created.
- Parent properties available to choose from.
- Show/Hide all properties of this class.
During the process of extending an existing schema via the Schema Playground you are asked to choose a short name for new Class/property definitions. This name is also used to suggest the namespace registered with us when you visualize then register your schema. The namespace will be the new homepage for your schema. E.g. http://discovery.biothings.io/ns/<namespace>.
Your namespace must be unique and it can only contain lower-case web-safe characters.
After you log in the registration option will be available to you when you view your schema using it's url in the Schema Playground. Registration is simple and it only requires you to choose a namespace
You will need a valid GitHub account or an approved organization account to register new schemas. Sign up for one, it's easy and free!
- Share your work with other members of the community. Your schema definition could be helpful to many others in the community as a starting point for their reserach.
- By registering a schema derived from an existing schema you are helping to maintain the FAIR (Findable, Accessible, Interoperable, Reusable) principles by making data more Reusable.
- It's easy to register your schema! If everything looks good here all you have to do is choose a namespace for your schema's homepage.
- You'll be able to easily share your schema and visualize it in a way that it's easy to understand.
Discovery Guide
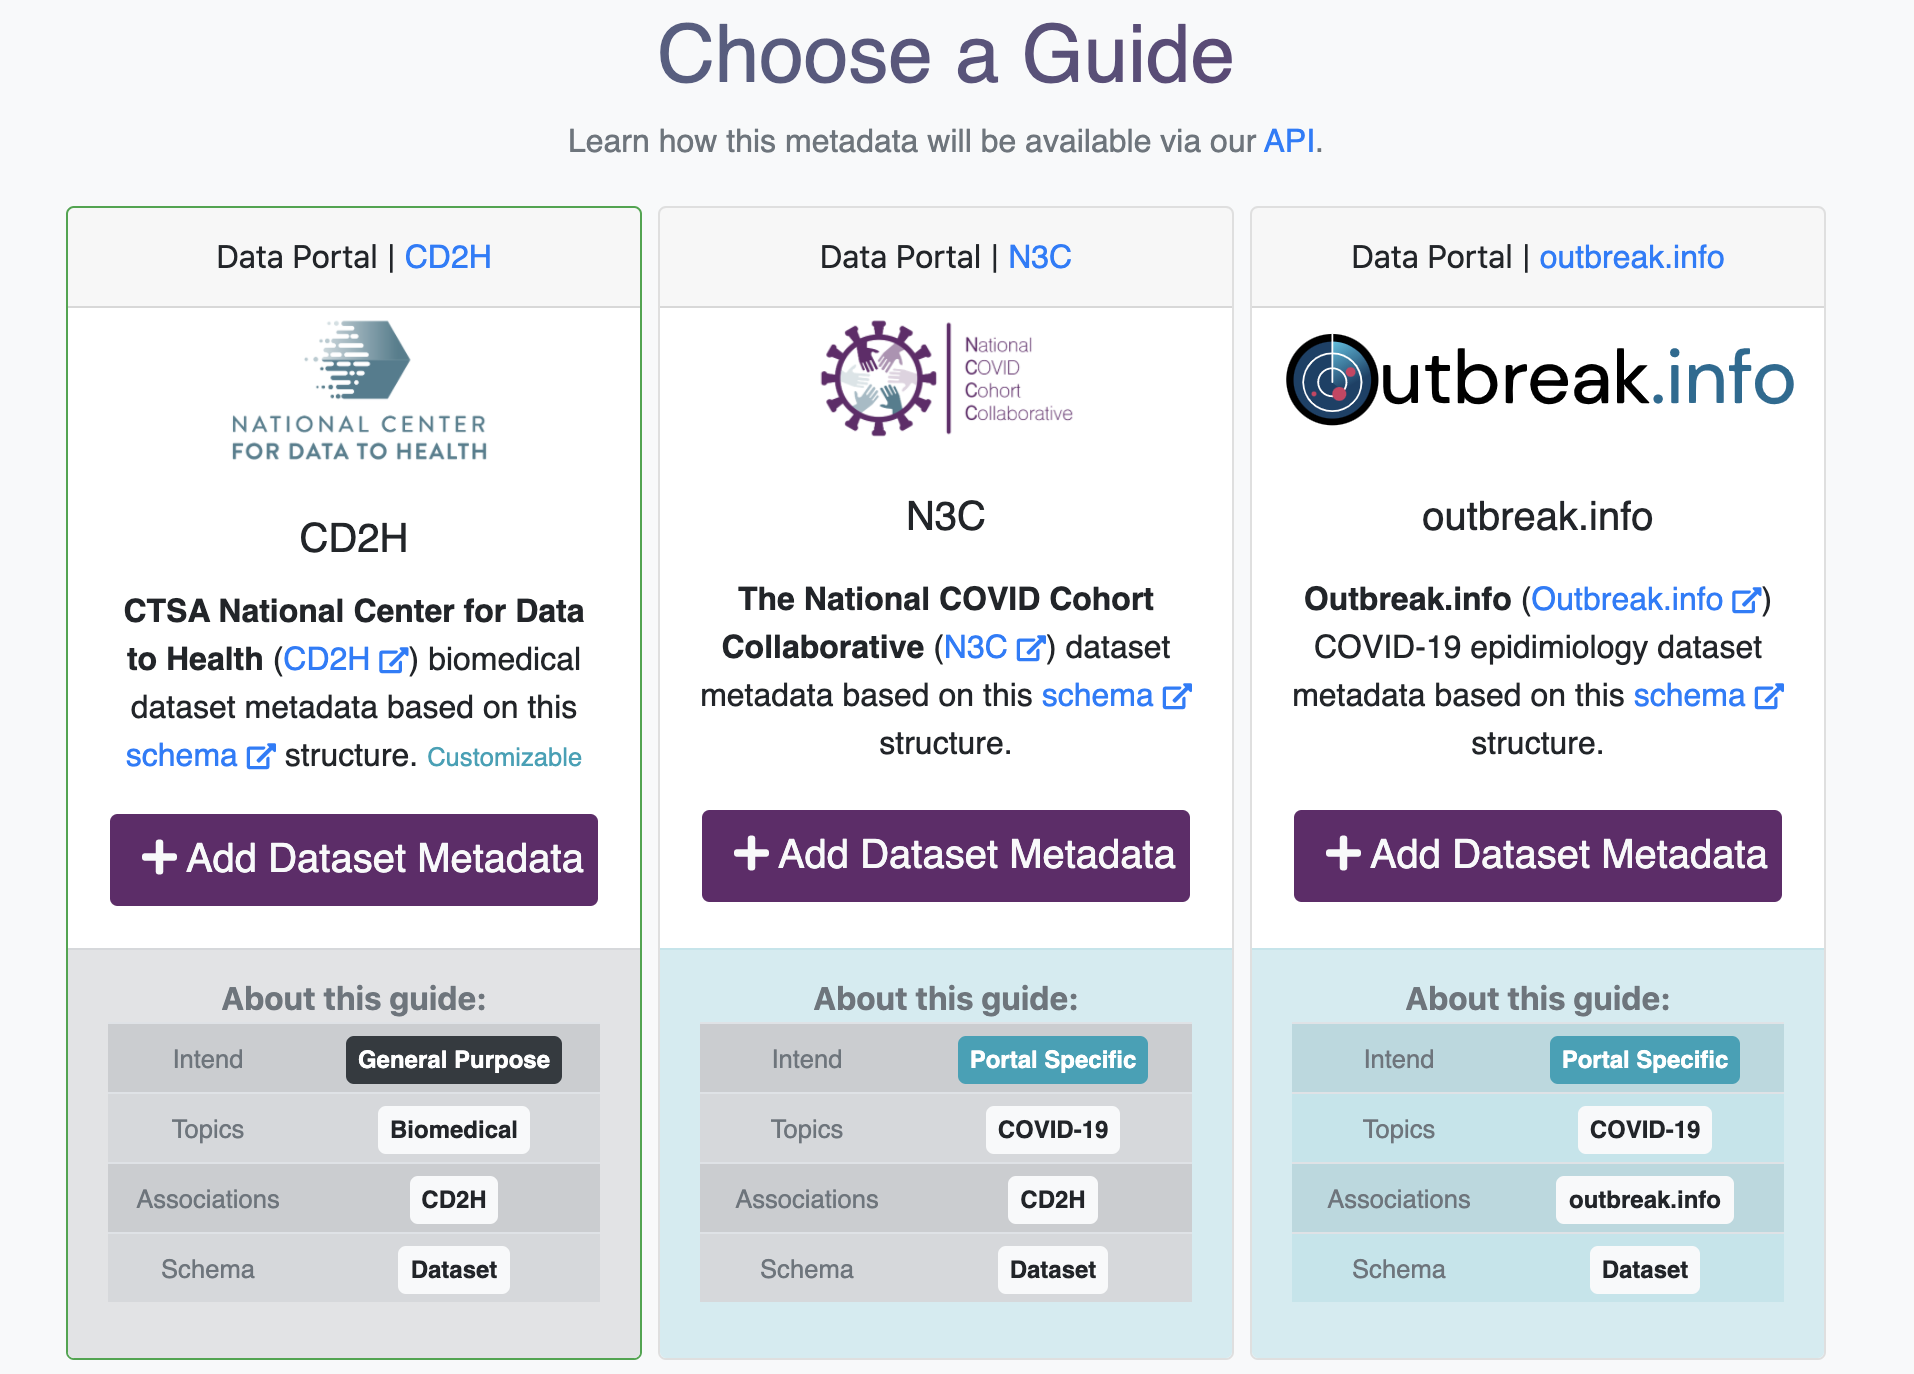
Guides allow you to contribute metadata to particular Data Portal. The generated metadata will be structured to that Data Portal's schema meaning that your metadata will be able to be integrated into that Data Portal.
Each Data Portal provides a guide based on a schema and that guide is dynamically generated based on that particular schema's validation rules to ensure that your input is valid and your contribution is ready to be integrated into that Portal.
Select the portal you wish to contribute based on your interests and click on it's Add Dataset Metadata button. You will be taken to a form that will guide you through required and recommended fields by that portal.
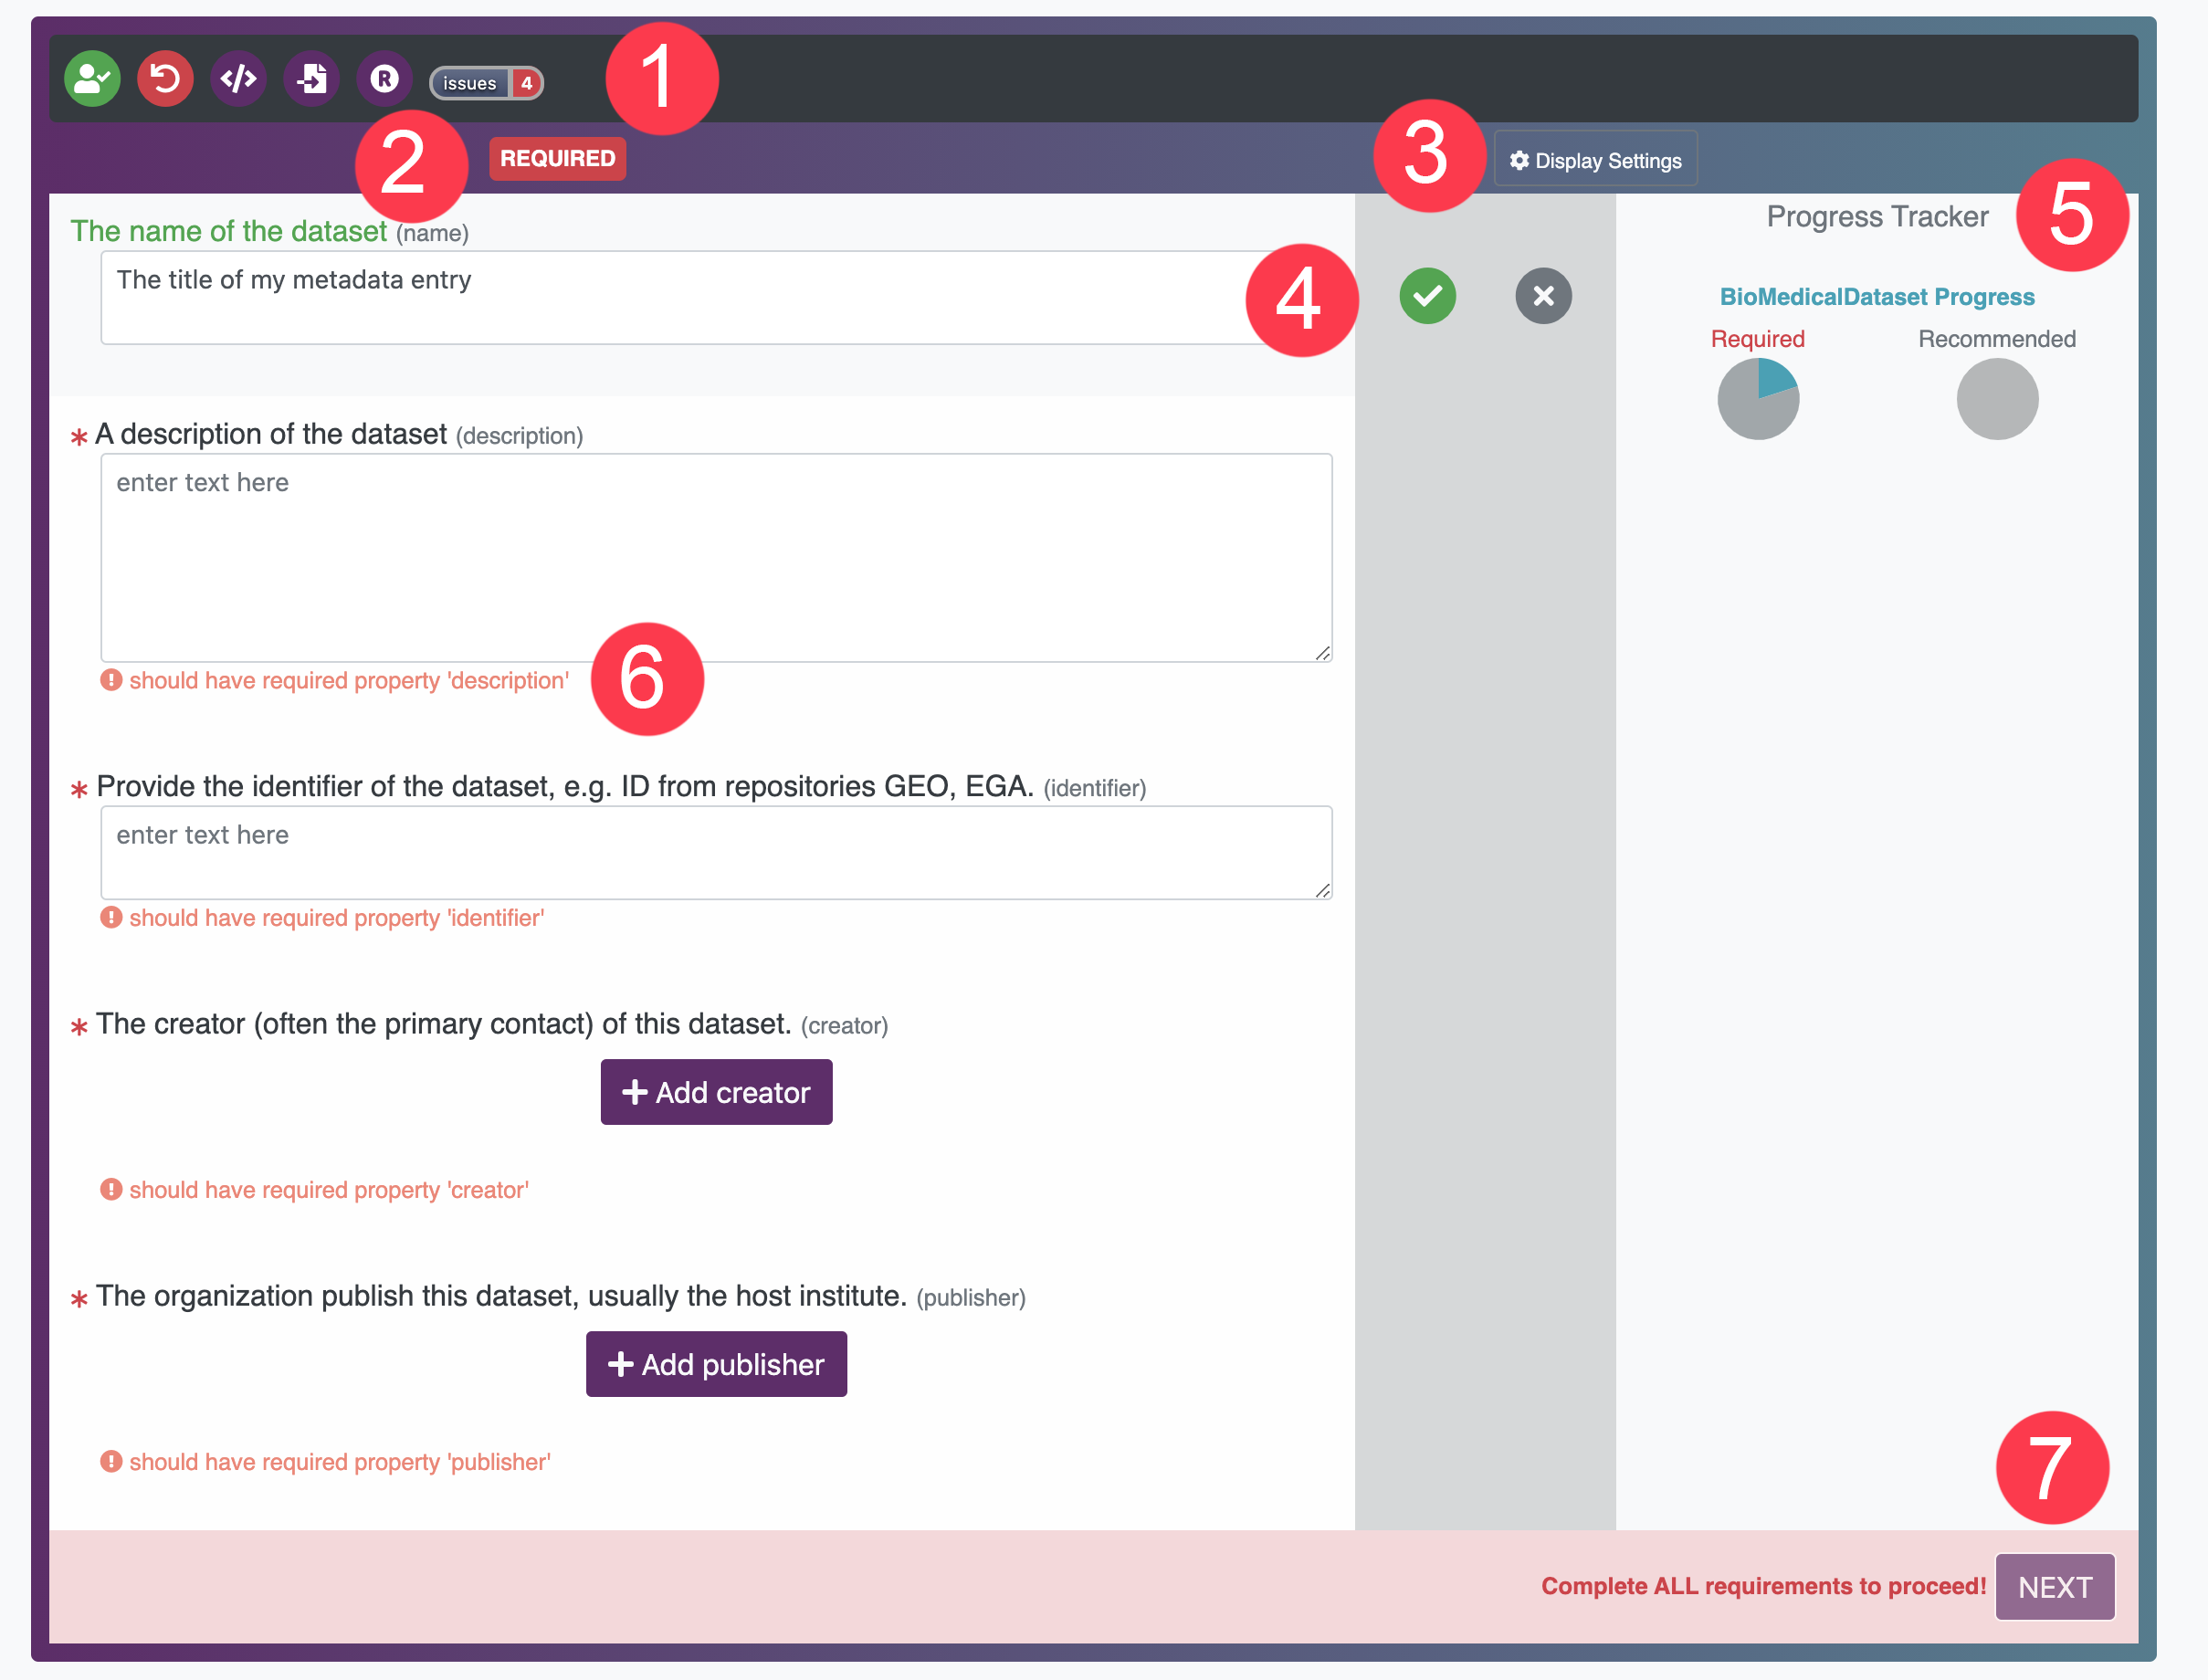
It's really easy and fast! Here's a quick introduction to the layout:
- (Login Status, Start Over, Preview Progress, Import Metadata, Bulk Registration, Issue Details)
- Current category.
- Change display settings.
- Clear/Complete (if viewing one item at a time) option.
- Track progress across categories.
- Issue details for that field.
- Continue to next page. (Available when requirements are met)
After successfully contributing an item whether it is a schema or metadata you will be able to manage it via your dashboard. To view your dashboard you must log in using a valid GitHub account or approved organization.
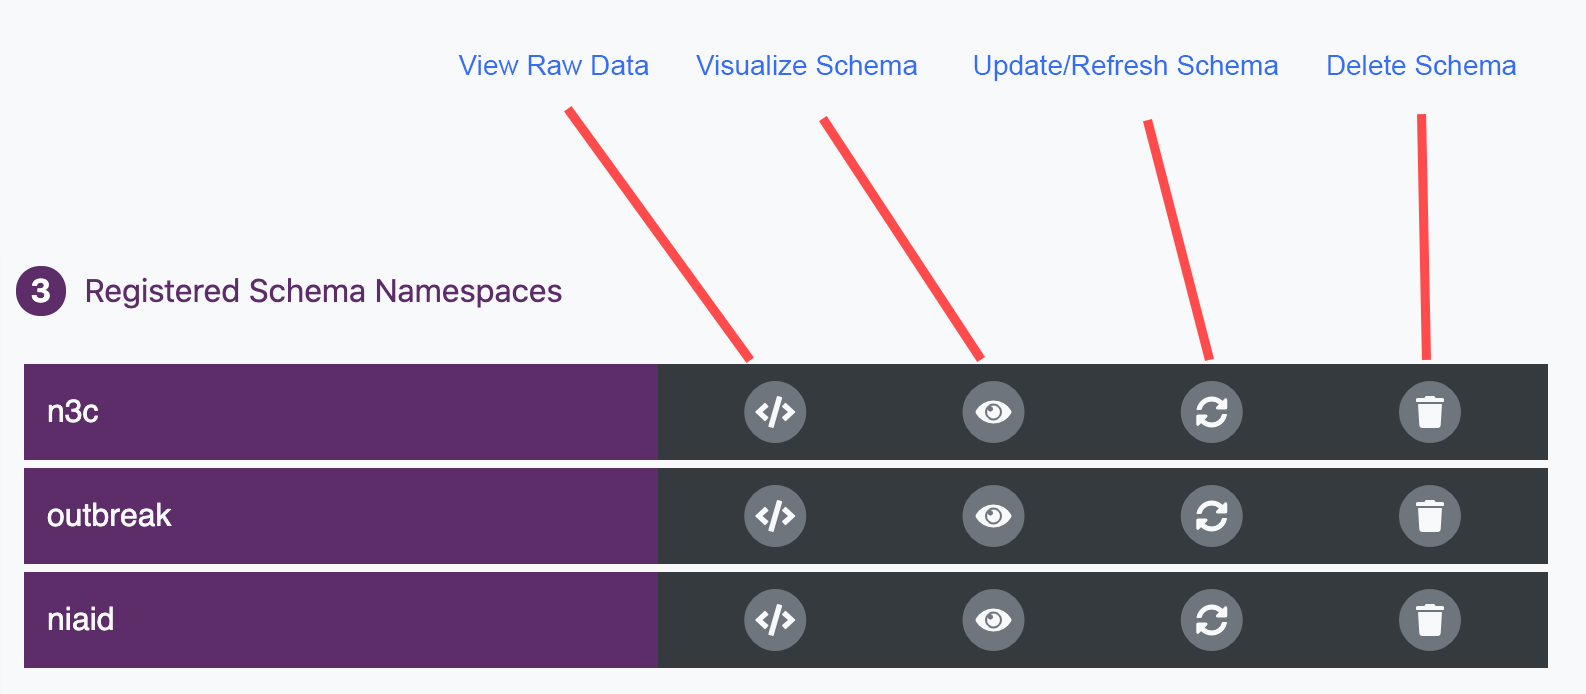
You can manage your registered schemas and metadata on your dashboard and each provides their own set of options. Take a look below:
From your dashboard you can view, update and delete any registered item.
Options include: view, quick edit, make private/public, and delete.

Your user dashboard is the place to do that. If you are the user that registered that item you will see it listed in your dashboard.
Click on the icon and it will be deleted. Warning: This action cannot be reverted!
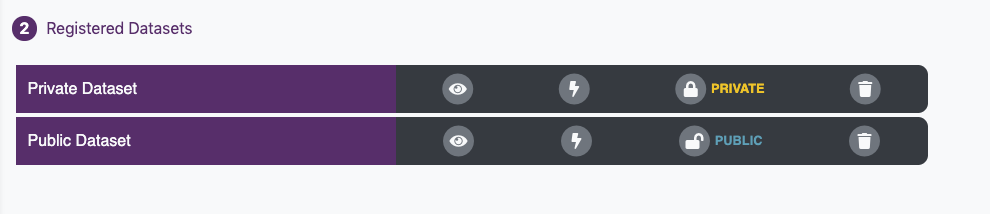
All new entries are set to PUBLIC as default. You can change this anytime in your dashboard. Note: Making any changes to the metadata will revert its status to PUBLIC but you can change the setting once your are done.
Simply click on the Edit Privacy button and confirm the new status.
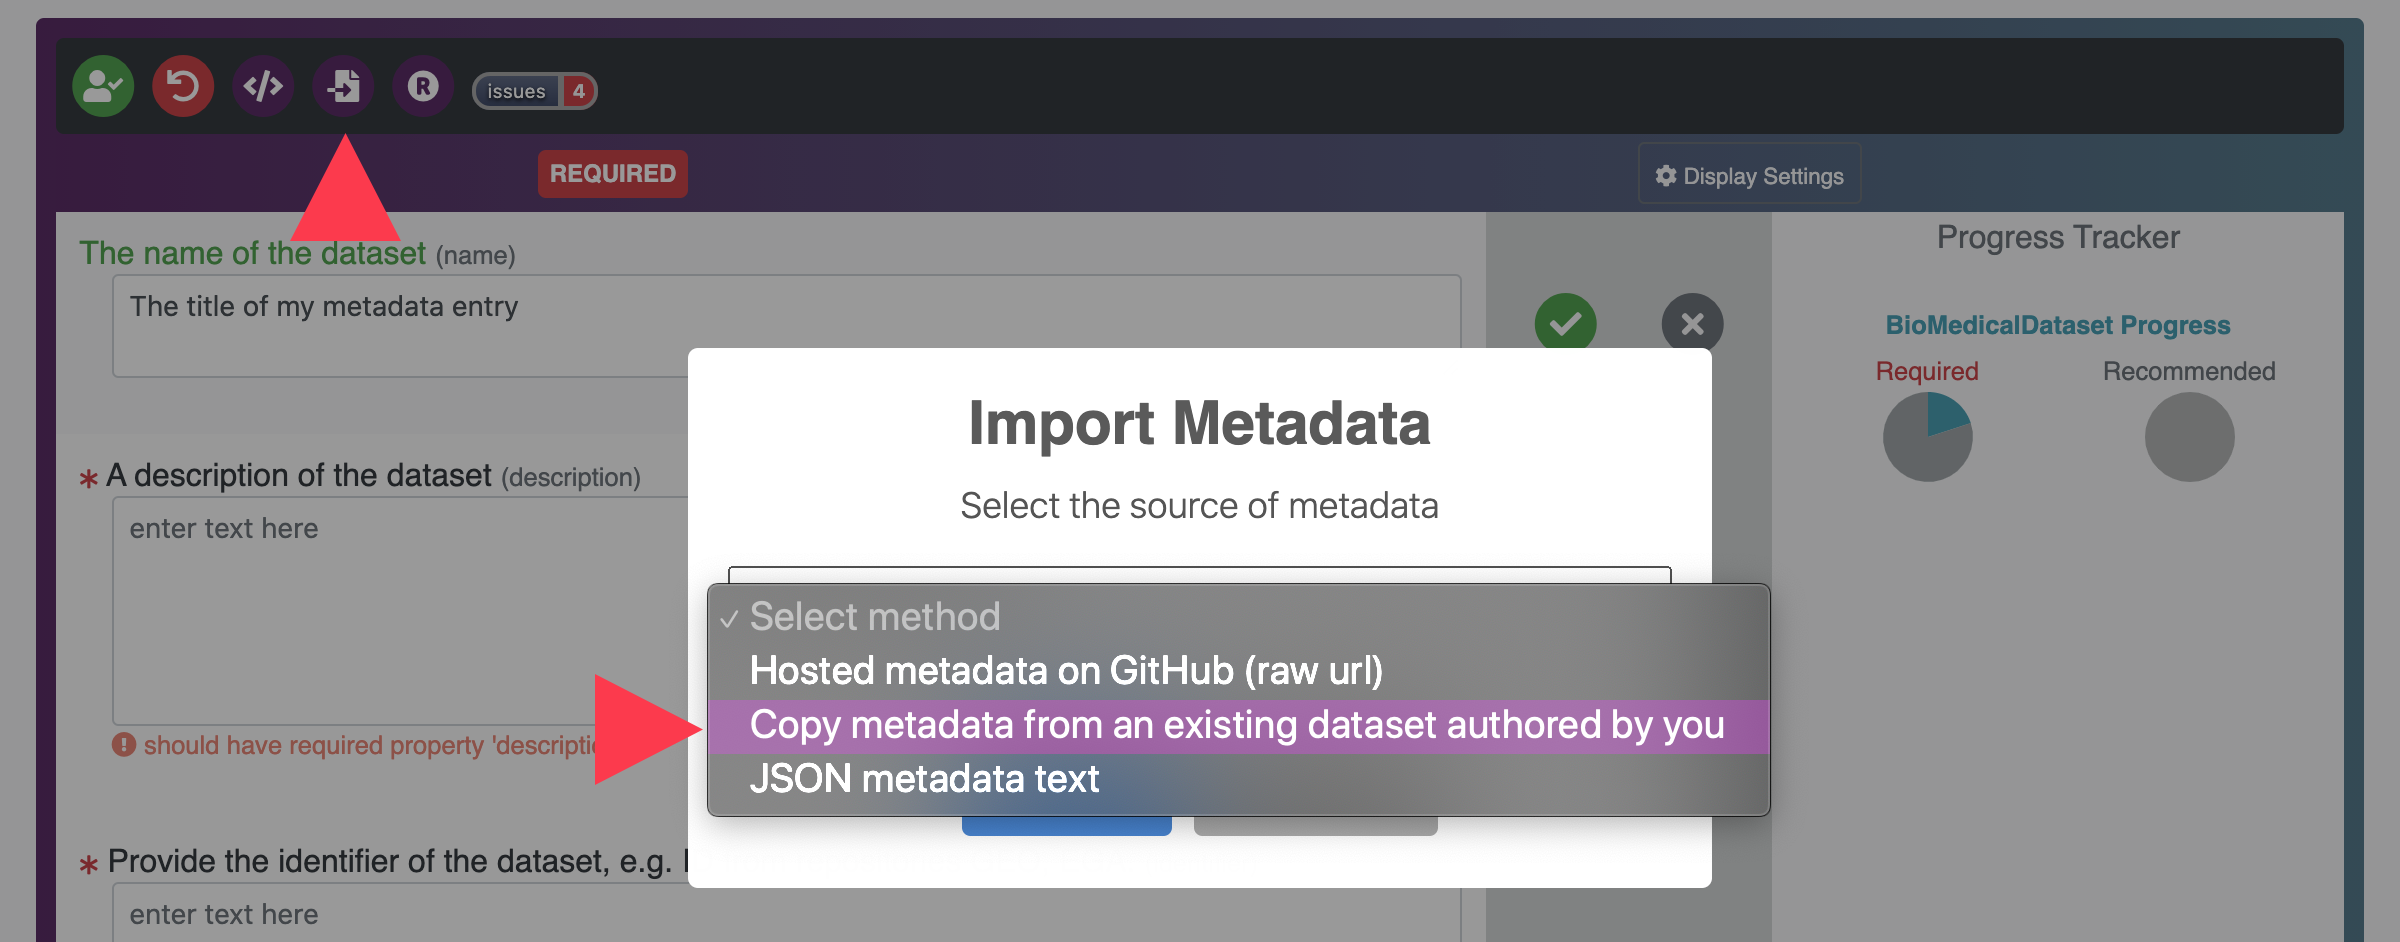
Each metadata entry is generated via a guide, so to properly edit an already registered item you will need to load it back into it's guide.
Choose the guide you previously used and choose Import Metadata from the guide menu and choose the item you want to edit. All available matching fields will be populated with your data. Note: If you change the identifier field it will result in creating a new registry item.
Note: Making any changes to the data will revert its privacy status to PUBLIC but you can change the setting once your are done in your dashboard.
Click on the Load Existing Data edit existing data.